Lens Testing – Our Precision MTF Test Jig
Recently we designed and built a precision motion stage capable of focus adjustments to about 0.5um. Yes, that is 500nm, or about the wavelength of green light. It’s stable, has smooth travel of a few mm. Based on a flexure design, so there’s no bearings to ‘rumble’ or cause misalignment.
We recently built this rig to test the MTF of cinema and medium format lenses
This project shows how we combine off the shelf parts and custom parts to get a job done. Our goal was helping our client specify their unusual custom lens, so that it could be manufactured. Their custom lens had to work with a range of existing medium format photo lenses and with cinematography ‘prime’ lenses. Since the catalog information about these medium format and cinema lenses was not detailed enough for our client’s design needs, we needed to make some measurements.
The common image quality metric is the Modulation Transfer Function, MTF. The MTF function describes the image modulation vs. spatial frequency – perceptually, it’s equivalent to contrast. Good looking images have high contrast in the mid range spatial frequencies. (For more info, check out this excellent tutorial on this topic, Norman Koren tutorial about MTF ).
We used some parts from Thor labs, our PointGrey camera, the excellent ImageJ software, and our own flexure stage design.
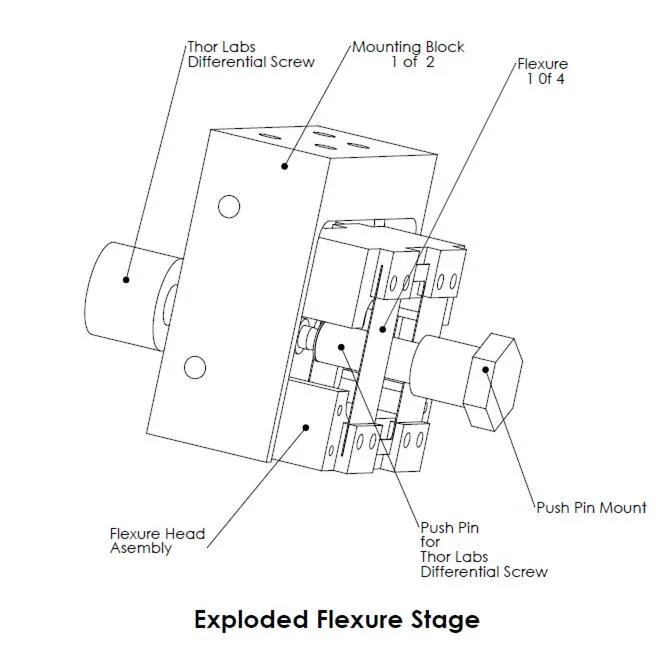
Exploded drawing showing the internals of the flexure stage.
We needed an imager with 0.5 micron pixels, so we used a 10X microscope objective in front of the PointGrey camera (which has about 5um pixels) to get the line pair per mm resolution we needed for the tests.
Development Details:
The custom lens design for our client requires an image modulation consistent with the cinema/large format lenses used in the application. The MTF data is infrequently given in these commercial camera lens data sheets, we realized we needed to measure the MTF ourselves. We found an excellent method to calculate MTF from an image of an optical step, which was purposefully slightly misaligned to the imager pixel array. Intuitively, each pixel acts as a pinhole, the array of pixels effectively scans the pinhole, and the resulting data are like scanning the edge of the image bar. The computer program calculates the MTF from the “scanned edge” profile.
We needed an imager with 0.5 micron pixels, so we applied the idea of a scanning micro-densitometer. The micro-densitometer uses microscope optics to magnify the image structure in the film for subsequent analysis. So we reached into our lens bin for a 10X microscope objective.
We found rotating the focus ring on the camera lenses was inadequate for precision focus, and our work was compounded by a lens without a focus ring. The camera this lens is designed for has a translating lens mount, with a bellows for eliminating stray light. Our lens bench does not have the precision required for focus either.
The problem was solved by combining a flexural translation stage with a differential adjusting screw from Thor Labs. This screw advances 250 microns per revolution with the external threads, and the internal differential screw advances 25 microns per revolution. At first use, it was apparent the design was adequate for the task.
We verified the performance of the 10X objective by getting crisp images of a Roncii ruling. Then we measured the on axis MTF of the photographic lenses of interest to learn that part of lens performance.
Our first, hand made, stage was not robust enough for laboratory conditions. We decided to design and build a robust version that interfaced easily to commercial optical bench components. The attached photos show the device almost ready for work.
Here’s a pdf version of this document, which includes Thor Labs part numbers for the lens tube parts needed, MTF-Testing-071510.

